About Me

My photo
India
Hey there, lovely people! I'm Hemant Menaria, and I'm passionate about programming. Having completed my MCA in 2011, I've delved into the world of coding with fervor. I believe in sharing knowledge, making complex concepts easy to grasp for everyone. JAVA, PHP, and ANDROID hold a special place in my heart, and I spend most of my time immersed in them. Currently, I'm deeply engaged in API/Webservice frameworks and crafting Hybrid mobile applications to enhance flexibility in the digital realm. If you ever find yourself stuck with a programming challenge, feel free to reach out to me at +91-8955499900 or drop me a line at hemantmenaria008@gmail.com. I'm always eager to help fellow enthusiasts navigate the intricacies of coding!

Friday, November 8, 2024

ESP Ardiuno program to controll a Motor through Firebase on Internet.


Here sharing a ESP8266 (Using Nodemcu) ariuno program to controller a motor over internet using firebase.

In below example as i am controller a motor that have a capacitor so as i ON Motor (RelayStart =13) program should ON a capacitor (RelayCapaciter=14)  for 3 second then Off it.

Below code have i wifi configuration page where you can enter your wifi router SSID and password. Follow below steps:

1- First paste your firebase Host and Auth key in code.

2- Connect Nodemcu GPIO pin 13 to Relay (Motor) ON.

3- Connect Nodemcu GPIO pin 14 to RelayCapaciter (for capacitor).

4- Now burn the code in node mcu 8266.

5- To configure your router ssid password. Press Flash button of nodemcu for 3 to 5 seconds. It will enable esp to AP mode and you can get a wifi network with name of ESP-TEST.

6- Connect to this Access Point.

7- Now open borwser and type 192.168.4.1 and you will get a page to enter SSID and Password of your router.

8- Finally click on Submit. Now it has been successfullly connected to your router.

9- Now open your firebase account and you will get two veriable in firebase database. MotorCommand and MotorStatus.  Enter ON in MotorCommand it will on the ESP (Motor) as motor on ESP will write back the ON status to MotorStatus variable at firebase.

10- Done.

#include <ESP8266WiFi.h>

#include <ESP8266HTTPClient.h>

#include <ESP8266WebServer.h>

#include "FirebaseESP8266.h"

#include <ESP8266mDNS.h>

#include <ArduinoJson.h>

#include <EEPROM.h>


//------------------ Variables--------------------------

int statusCode;

String ssid = "";

String passphrase = "";

String st;

String content;

const int triggerPin = 0;

bool IN_ST_MODE_FLAGE = true;

bool IN_AP_MODE_FLAGE = false;


int c = 0;

int Current_Gate_Status;

int Last_Gate_Status;


const int RelayStart = 13;   //On-off

const int RelayCapaciter = 14;  // for capacitor


String Last_Status = "OFF"; 

unsigned long triggerStartTime = 0; // Variable to store the start time of trigger pin low state


//======================= ON NET =========================================

#define FIREBASE_HOST "Paste you firebase host"

#define FIREBASE_AUTH "Paster your firebase Auth key"


FirebaseData fbdo;

unsigned long sendDataPrevMillis = 0;

String commandpath = "/MotorCommand";

String currentStatusPath = "/MotorStatus";

uint16_t count = 0;

void printResult(FirebaseData &data);

ESP8266WebServer server(80);

void setup() 

{

  Serial.begin(115200);

  pinMode(triggerPin, INPUT);  

  pinMode(RelayCapaciter,OUTPUT);

  pinMode(RelayStart,OUTPUT);

  digitalWrite(RelayStart, HIGH);

  digitalWrite(RelayCapaciter, HIGH);

  //Serial.println();

  //Serial.println("Disconnecting previously connected WiFi");

  WiFi.disconnect();

  EEPROM.begin(512); 

  //Serial.println();

  //Serial.println("Startup");

  //Serial.println("Reading EEPROM ssid");

  String esid;

  for (int i = 0; i < 32; ++i) {

    esid += char(EEPROM.read(i));

  }

  //Serial.println();

  Serial.print("SSID: ");

  Serial.println(esid);

  //Serial.println("Reading EEPROM pass");


  String epass = "";

  for (int i = 32; i < 96; ++i) {

    epass += char(EEPROM.read(i));

  }

  //Serial.print("PASS: ");

  //Serial.println(epass);

    WiFi.mode(WIFI_STA);

  //  WiFi.forceSleepWake(); // Ensure it's awake   set it before wifi.begin()

   // WiFi.setSleepMode(WIFI_NONE_SLEEP); // Disable sleep mode


  if(ssid!="")

  WiFi.begin(ssid, passphrase);

  else

  WiFi.begin(esid, epass);


  if (waitForWiFiConnection()) 

  {

    Serial.println("Connected to WiFi");

    Serial.println(WiFi.localIP());

  } 

  else   

    Serial.println("Failed to connect to WiFi");


  ESP.wdtEnable(10000);   //set watchdog timer for 10 second


  firebaseConnect();  //connecting to firebase  

}


void firebaseConnect()

{

  Firebase.begin(FIREBASE_HOST, FIREBASE_AUTH);

  Firebase.reconnectWiFi(true);  

  fbdo.setBSSLBufferSize(1024, 1024);  

  fbdo.setResponseSize(1024);

  if (!Firebase.beginStream(fbdo, commandpath))

  {

    Serial.println("------------------------------------");

    Serial.println("Can't begin stream connection...");

    Serial.println("REASON: " + fbdo.errorReason());

    Serial.println("------------------------------------");

    Serial.println();

  }

   Firebase.setString(fbdo, commandpath , String("OFF"));

   Firebase.setString(fbdo, currentStatusPath , String("OFF"));

}


void loop() 

{

  ESP.wdtFeed();

  //Serial.println(ESP.getFreeHeap());


//===============================================================================

    if (IN_ST_MODE_FLAGE == true)  //Current ST MODE

    {

          if (digitalRead(triggerPin) == LOW) 

          {

            if (triggerStartTime == 0) 

            { // If trigger pin just went low, start the timer

                triggerStartTime = millis();

                Serial.println("Trigger Pin Low");

            } 

            else 

              if (millis() - triggerStartTime >= 3000) 

              { // If trigger/flash button pressed more than 3 seconds than move to AP mode

                  WiFi.disconnect();

                  WiFi.softAP("GateController", ""); // Fixed AP name

                  IN_ST_MODE_FLAGE = false;

                  IN_AP_MODE_FLAGE = true;

                  Serial.println("Switched to AP mode");

              }

            } 

            else             

                triggerStartTime = 0; // Reset the timer if trigger pin goes high


            if (WiFi.status() != WL_CONNECTED  && IN_ST_MODE_FLAGE == true)            

                 Serial.println("Not connected to WiFi");


            if (!fbdo.httpConnected() && IN_ST_MODE_FLAGE == true) 

            {

                    Serial.println("Unable to connect firebase");  // if firebase connection failed then reconnect

                    firebaseConnect();  //reconnect to firebase;   

            }


            /*  if (!checkInternetConnection())   //check Internet working or not

                       Serial.println("No Internet.");   

                    else             

                Serial.println("Internet Connected.");  */


           if (WiFi.status() == WL_CONNECTED && IN_ST_MODE_FLAGE == true) 

           {

                   String State = (fbdo.stringData());   

                   if( State == "ON" && Last_Status=="OFF")

                      {                        

                        // Serial.print("--State ");

                        // Serial.println(State); 

                          digitalWrite(RelayStart, LOW);

                          digitalWrite(RelayCapaciter, LOW);

                          delay(3000);                        

                          digitalWrite(RelayCapaciter, HIGH);

                          Last_Status="ON";                        

                          Firebase.setString(fbdo, currentStatusPath , String("ON"));                       

                      }

                    else

                    {

                      if( State == "OFF" && Last_Status=="ON")

                      {

                          //Serial.print("--State ");

                          //  Serial.println(State); 

                          digitalWrite(RelayStart, HIGH);

                          Last_Status="OFF";

                          Firebase.setString(fbdo, currentStatusPath , String("OFF"));                        

                      }

                    }

                  if (!Firebase.readStream(fbdo)){}

                  if (fbdo.streamAvailable()){}

           }

     }

//------------------------------------------------------------------------------

    if (IN_ST_MODE_FLAGE == false)  // Current AP MODE

     {

          //waitForWiFiConnection();

          if (IN_AP_MODE_FLAGE == true) 

            {

              Serial.println("IN AP Mode ");

              launchWeb();

              setupAP();

              IN_AP_MODE_FLAGE = false;           //  Wapable lonnched

            }

         server.handleClient();

     }        

    delay(10);  

}


//===============================================================================    


bool waitForWiFiConnection() 

{

  int c = 0;

  //Serial.println("Waiting for WiFi to connect");

  while (c < 80) {

    if (WiFi.status() == WL_CONNECTED) 

    {

      IN_ST_MODE_FLAGE = true;

      return true;

    }

    delay(500);

    Serial.print("*");

    c++;

  }

  //Serial.println("\nWiFi connection timed out");

  return false;

}

void handleRoot() 

{

  IPAddress ip = WiFi.softAPIP();

  String ipStr = String(ip[0]) + '.' + String(ip[1]) + '.' + String(ip[2]) + '.' + String(ip[3]);

  content = "<!DOCTYPE HTML>\r\n<html>ESP8266 WiFi Connectivity Setup ";

  content += "<form action=\"/scan\" method=\"POST\"><input type=\"submit\" value=\"scan\"></form>";

  content += ipStr;

  content += "<p>";

  content += st;

  content += "</p><form method='get' action='setting'><label>SSID: </label><input name='ssid' length=32><input name='pass' length=64><input type='submit'></form>";

  content += "</html>";

  server.send(200, "text/html", content);

}


void setupAP() 

{

  WiFi.mode(WIFI_STA);

  WiFi.disconnect();

  delay(100);

  int n = WiFi.scanNetworks();

  //Serial.println("Scan completed");

  if (n == 0)

    Serial.println("No WiFi Networks found");

  else {

    //Serial.print(n);

    Serial.println(" Networks found");

    for (int i = 0; i < n; ++i) {

      Serial.print(i + 1);

      Serial.print(": ");

      Serial.print(WiFi.SSID(i));

      Serial.print(" (");

      Serial.print(WiFi.RSSI(i));

      Serial.print(")");

      Serial.println((WiFi.encryptionType(i) == ENC_TYPE_NONE) ? " " : "*");

      delay(10);

    }

  }

  //Serial.println("");

  st = "<ol>";

  for (int i = 0; i < n; ++i) {

    st += "<li>";

    st += WiFi.SSID(i);

    st += " (";

    st += WiFi.RSSI(i);

    st += ")";

    st += (WiFi.encryptionType(i) == ENC_TYPE_NONE) ? " " : "*";

    st += "</li>";

  }

  st += "</ol>";

  delay(100);

  WiFi.softAP("ESP-TEST", ""); // Set your desired AP name

  //Serial.println("Initializing WiFi access point");

  launchWeb();

  //Serial.println("Over");

}


void handleSetting() {

  String qsid = server.arg("ssid");

  String qpass = server.arg("pass");

  if (qsid.length() > 0 && qpass.length() > 0) {

    //Serial.println("Clearing EEPROM");

    for (int i = 0; i < 96; ++i) {

      EEPROM.write(i, 0);

    }

    //Serial.println(qsid);

    //Serial.println("");

    //Serial.println(qpass);

    //Serial.println("");


    //Serial.println("Writing EEPROM ssid:");

    for (int i = 0; i < qsid.length(); ++i) {

      EEPROM.write(i, qsid[i]);

      //Serial.print("Wrote: ");

      //Serial.println(qsid[i]);

    }

    //Serial.println("Writing EEPROM pass:");

    for (int i = 0; i < qpass.length(); ++i) {

      EEPROM.write(32 + i, qpass[i]);

      //Serial.print("Wrote: ");

      //Serial.println(qpass[i]);

    }

    EEPROM.commit();


    content = "{\"Success\":\"Saved to EEPROM... Reset to boot into new WiFi\"}";

    statusCode = 200;

    ESP.reset();

  } else {

    content = "{\"Error\":\"404 not found\"}";

    statusCode = 404;

    //Serial.println("Sending 404");

  }

  server.sendHeader("Access-Control-Allow-Origin", "*");

  server.send(statusCode, "application/json", content);

}


void handleScan() {

  content = "<!DOCTYPE HTML>\r\n<html><a href='/'>Go back</a></html>";

  server.send(200, "text/html", content);

}


bool checkInternetConnection() {

  WiFiClient client;

  return client.connect("8.8.8.8", 53);  // Try to connect to Google's DNS

}


void launchWeb() {

  //Serial.println("");

  if (WiFi.status() == WL_CONNECTED)

    Serial.println("WiFi connected");

  //Serial.print("Local IP: ");

  //Serial.println(WiFi.localIP());

  //Serial.print("SoftAP IP: ");

  //Serial.println(WiFi.softAPIP());

  server.on("/", HTTP_GET, handleRoot);

  server.on("/scan", HTTP_GET, handleScan);

  server.on("/setting", HTTP_GET, handleSetting);

  server.begin();

  //Serial.println("Server started");

}


Sunday, November 7, 2021

Apache Cordova app issues

Here I am sharing all the issues/errors which I get during Cordova mobile app development-

1-Call to undefined method mysqli_stmt::get_result

Solution: https://stackoverflow.com/questions/8321096/call-to-undefined-method-mysqli-stmtget-result

cpanel dispable mysqli and enable nd_mysqli


2- Server origin access issue  (Unable to access API hosted on server)

   v1=> .htaccess => added following lines

<IfModule mod_headers.c>

    Header set Access-Control-Allow-Origin "*"

</IfModule>


3- Emulator : net not working. 

   First change DNS to 8.8.8.8 of the computer where avd running.

   Now open android studio=> tools=>AVD manager=> select drop down arrow of the AVD(Emulator)=> click on "Cold Boot Now"


4- Add platform: cordova platform add android

                 cordova platform rm android

cordova platform add browser


5- Run app into emulator:

cordova build --emulator

cordova run android --emulator

To run in mobile-> cordova run or cordova run android

To browser  cordova run browser


6- Biggest Issue: 

i) Why am I seeing net::ERR_CLEARTEXT_NOT_PERMITTED errors in cordova 8/9.....?

        ii) was unable to call API using jquery ajax : Error was cordova app ajax api call returning xhr.status 0

Solution: go to config.xml

<widget id="com.my.awesomeapp" version="1.0.0" xmlns="http://www.w3.org/ns/widgets"

xmlns:android="http://schemas.android.com/apk/res/android" xmlns:cdv="http://cordova.apache.org/ns/1.0">

this line already in config.xml but here you can see xmln:android  not there so just copy xmlns:android="http://schemas.android.com/apk/res/android" 

and past it there.

now past below <edit-config....>....</edit-config> into <plateform name="android"> ..../<platform> section.

<platform name="android">

  <edit-config file="app/src/main/AndroidManifest.xml" mode="merge" target="/manifest/application">

      <application android:usesCleartextTraffic="true" />

  </edit-config>

</platform>

for more details please check https://stackoverflow.com/questions/54752716/why-am-i-seeing-neterr-cleartext-not-permitted-errors-after-upgrading-to-cordo


7- Issue : if you want to use <script> in .html file then need to add follwoing

 <meta http-equiv="Content-Security-Policy" content="default-src *; style-src 'self' http://* 'unsafe-inline'; script-src 'self' http://* 'unsafe-inline' 'unsafe-eval'" />

Saturday, November 6, 2021

How to analyze windows event log


Open windows event viewer-

1- Open Control Panel.

2- Click on Administrative Tools.

3- Now open Event Viewer.

In the console tree, expand Windows Logs, and then click System. The results pane lists individual system events.

Now before proceeding further we should know the event id of the event which we want to analyze. here we want to check system shut down, reboot, start etct so event id is given below-

Event ID 41: The system rebooted without cleanly shutting down first. This error occurs when the system stopped responding, crashed, or lost power unexpectedly.

Event ID 1074: Indicates that the shut down process was initiated by an app or user, or when a user initiates a restart or shutdown. Your computer records this event when an application forces your laptop to shut down or restart. This event also helps you know when a user restarted or shut down the computer from the Start menu or by using CTRL+ALT+DEL.

Event ID 6006 - The clean shut down event. This means Windows 10 was turned off correctly.  It gives the message, “The Event log service was stopped.”

Event ID 6008 - Indicates a dirty/improper shutdown. Appears in the log when the previous shutdown was unexpected, e.g. due to power loss or BSoD (Bug check).you  will see this event in your system log. It gives the message, “The previous system shutdown at time on date was unexpected.”


After this, we can find the particular event by Option "Filter Current logs" in the right side action tab and you can see all the logs with time for that particular event. 

If you want to see more details about a specific event, in the results pane, click the event.


Thursday, June 17, 2021

Oracle Network Adapter Could Not Establish The Connection Error


The Network Adapter Could Not Establish The Connection Error in oracle.


Hey guys! Have you ever faced the TNS IO error saying “The network adapter could not establish the connection”? when you are trying to make a new connection in SQL Developer or logging on to the database using SQL*Plus editor. If yes then you are at the right place because here in this blog I am going to show you how you can solve this error. 


So without further ado let’s proceed to solve this badass TNS error.

Step 1: Make sure your entries are correct

First of all to solve “The network adapter could not establish the connection” error, check whether you have entered the correct username and password as well as the correct Hostname and Port number. Though these are small things we cannot avoid them. After all “It’s the small things in a relationship that means the most.” 

[bctt tweet=”How to solve “The network adapter could not establish the connection” error in just 2 steps” username=”RebellionRider”]

For the valid hostname and port number, you can check the Listener.ora if you have access to your server as the listener is a server process. In case you don’t have access to listener.ora file then you can check the tnsnames.ora file.

In case of Listener.ora file check for Host and Port entry in Listener tag for valid hostname and port number.

Listener.ora

And if you are using TNSnames.ora file for validating the hostname and port number then search for the entry which has the same name as your SID and then check for host and port number entry in that particular tag.

                                                        TNSnames.ora

Now try connecting. If this solves your problem then you can avoid the next step. But if “The network adapter could not establish the connection” error is still there, then don’t worry just follow the next step.


Step 2: Is your listener taking a rest?

If your problem is still there and you haven’t gotten rid of that nasty error then there is a possibility that your Listener is not running. To check whether Listener is up and running or not, simply open up your command prompt with Administrative privileges and Write 

C:\> lsnrctl status

This command will show you the status of your listener. If the output of this command looks like the one shown in the picture below then it clearly means your listener is not running thus next what you have to do is to start the listener. 


To start the listener you just have to write

C:\> lsnrctl start.

This will start your listener and most probably solve your problem.

Info Byte:
In case you are hav ing problems in starting your listener then try starting “OracleOraDb11g_home1TNSListener” windows service. For that open your Run Command and write services.msc this will open your service panel. Here search for the same and right click to start it.

Special thanks to Mr. Manish Sharma http://www.rebellionrider.com/  for above information.

Forget oracle database username or password


Forget oracle database username or password

Recover oracle database username and password


Step-1: open sqlplus.

Step-2: type- connect / as sysdba   and password will be blank so just enter.

Step-3: Now you can see SQL> 

Step-4: To get all user type following query-

    SQL> select username,password from dba_users;

now find the user which you have created from the shown list and reset password by following query-

    SQL> alter user username identified by password;

Here username is the user for which you want to reset the password.


Create new user-

Step-1: open sqlplus.

Step-2: type- connect / as sysdba   and password will be blank so just enter.

Step-3: Now you can see SQL> 

Step-4 :To create new user type following query-

create user NewUserName identified by password

note: if you get "create user invalid common user or role name" error then just change the session by type following query-

    alter session set "_ORACLE_SCRIPT"=true;   

and try again to create user by step-4.

Step-5: Grant Previlage to oracle user (With DBA power)-

    GRANT CONNECT, RESOURCE, DBA TO NewUserName;

To grant all role to user-

    GRANT ALL PRIVILEGES TO NewUserName;


Wednesday, July 22, 2020

Export And Save Each Worksheet As Separate


Export And Save Each Worksheet As Separate New Workbook In Excel


Open Visual basic editor by pressing Alt+F11
On project window at left side => right click on project => insert=>Module.
now paste below code. 

Option Explicit

Sub SaveShtsAsBook()
    Dim Sheet As Worksheet, SheetName$, MyFilePath$, N&
    MyFilePath$ = ActiveWorkbook.Path & "\" & _
    Left(ThisWorkbook.Name, Len(ThisWorkbook.Name) - 4)
    With Application
        .ScreenUpdating = False
        .DisplayAlerts = False
         '      End With
        On Error Resume Next '<< a folder exists
        MkDir MyFilePath '<< create a folder
        For N = 1 To Sheets.Count
            Sheets(N).Activate
            SheetName = ActiveSheet.Name
            Cells.Copy
            Workbooks.Add (xlWBATWorksheet)
            With ActiveWorkbook
                With .ActiveSheet
                    .Paste
                    .Name = SheetName
                    [A1].Select
                End With
                 'save book in this folder
                .SaveAs Filename:=MyFilePath _
                & "\" & SheetName & ".xls"
                .Close SaveChanges:=True
            End With
            .CutCopyMode = False
        Next
    End With
    Sheet1.Activate
End Sub


Sunday, April 26, 2020

Set CATALINA_HOME, JRE_HOME, JAVA_HOME in environment variable using command line


To set CATALINA_HOME, JRE_HOME, JAVA_HOME in environment variable 

To run apache tomcat server this is a basic requirement-

1- Open command Prompt=> Run as administrator

2- Now type below command one by one.
setx JAVA_HOME -m "Java/JDK_Installation_Directory_Path";
setx JRE_HOME -m "Java/JRE_Installation_Directory_Path";
setx CATALINA_HOME -m "Tomcat_Directory_Path/bin";

3-Now restart system.

4- To verify environment variable run following command one by one-
echo %JAVA_HOME%
echo %JRE_HOME%
echo %CATALINA_HOME%

Now run tomcat.(in case of installer)
or
In case of tomcat downloaded folder-
1- Open command Prompt=> Run as administrator
2- Go to tomcat directory/bin folder.
3- execute/run startup.bat
4- you will get a separate window which shows tomcat status.

Its ready to play.

Various error during maven configuration with java spring


Q1- During project Creation or Maven Update or if Pom.xml showing any error or dependecy jar not loading then-
Solution:  Go to User Profile Foler =>.m2=>delete .lastupate.

if you unable to find User Profile folder then follow below steps-
1-Open folder by running this text (without Quotes) in Search Explorer of Window “%USERPROFILE%.m2”.
2-After running above command, “m2” folder of maven will open. Now search for file (without Quotes) “*.lastUpdated”.
3-In this step, delete all the files found by running Step 2.
4-Now go to Eclipse project and select “Maven | Update Dependency” or “Maven | Update Project”
5-If you still facing error then close eclipse and delete .m2 folder and try again.

-----------------------------------------------------------------------------------------
Q2- Could not transfer artifact org.apache.maven.plugins:maven-surefire-plugin:pom:2.7.1 from/to central
or
ArtifactTransferException: Could not transfer artifact
or
How to create settings.xml
Solution: Create settings.xml file in User Profile Foler =>.m2 folder.  ( if you are unable to fine user profile folder then see Q1 (above).
To create settings.xml file-> open notepad-> paste below code-> save as-> File Name- settings.xml. Save As Type- All and Save.

<settings xmlns="http://maven.apache.org/SETTINGS/1.0.0"
xmlns:xsi="http://www.w3.org/2001/XMLSchema-instance"
xsi:schemaLocation="http://maven.apache.org/SETTINGS/1.0.0
https://maven.apache.org/xsd/settings-1.0.0.xsd">
<localRepository>${user.home}/.m2/repository</localRepository>
<interactiveMode>true</interactiveMode>
<offline>false</offline>
</settings>
---------------------------------------------------------------------------------

Q3- tomcat:deploy: “Cannot invoke Tomcat manager: Connection refused”
Solution: Before deploying of project make sure following-
For tomcat7 or tomcat 8 do the following-

1- Project- pom.xml

<plugin>
    <groupId>org.apache.tomcat.maven</groupId>
    <artifactId>tomcat7-maven-plugin</artifactId>
    <version>2.2</version>
    <configuration>
        <url>http://localhost:8080/manager/text</url>       
        <path>/projectName</path>
        <username>tomcat</username>
        <password>tomcat</password>
    </configuration>
</plugin>

2- TomcatDirectory\conf\ tomcat-users.xml: Add below line in  section
<role rolename="manager-gui"/>
  <role rolename="manager-status"/>
  <role rolename="manager-script"/>
  <role rolename="manager-jmx"/>
  <user username="tomcat" password="tomcat" roles="manger-gui,manager-status,manager-script,manager-jmx"/>
it will show like this-
Now run project and deploy it (Right Click on project=>Run as=>Run Configuration)
Gole:- clean install tomcat7:deploy   (For first time deployment) and for next time use clean install tomcat7:redeploy
Profile:-Leave Blank
Gole:-Default or path (if you have created settings.xml)


Create a maven project and Deloy maven project with tomcat


In this tutorial we learn-
1- How to create Maven based Java web project.
2- How to deploy/run project with tomcat server.


First make sure your eclipse have installed maven plugin. if not then your need to install m2e-eclipse plugin in order to have this simple utility in Eclipse.


1  Create Maven Project in STS ( Spring Tool Suite ).


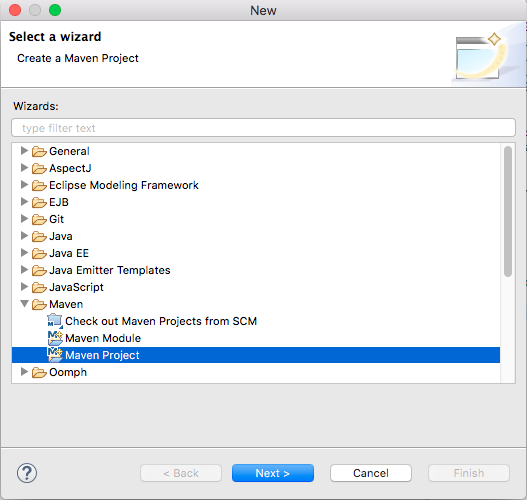
1-Click File —> New —> Others menu, select Maven Project in the popup wizard dialog.
eclipse file new others maven project wizard dialog

2-Click Next button, check Create a simple project checkbox in the next dialog.


3-Input the spring project group id, artifact id and select packaging type with war in the next dialog.


4-Click Finish button to complete the wizard. In the left package explorer panel, you can see the project just created, the project name is just the artifact id.


5-There is an error in the pom.xml, the error message is “web.xml is missing and is set to true“, so copy below xml code into pom.xml between project xml tag.
<build>
    <finalName>Deploy maven project to tomcat example</finalName>
       <plugins>
          <plugin>
             <artifactId>maven-war-plugin</artifactId>
             <version>2.3</version>
             <configuration>
               <failOnMissingWebXml>false</failOnMissingWebXml>
             </configuration>
          </plugin>
       </plugins>
</build>


6-Now right click the project name in left package explorer panel, click Maven —> Update Project menu item, then all the project error will disappear.


2. Deploy Maven Project To Tomcat.

First make sure following-
1- Tomcat is installed or have downloadd Tomcat Folder.
2-CATALINA_HOME (tomcat), JRE_HOME (jre) or JAVA_HOME (java) set in system environment veriable. (how to set environment veriable- http://hemantmenaria.blogspot.com/search/label/set%20catalina_home)
3- Need to start tomcat.

1-Before we can deploy eclipse maven project to tomcat, we need to add below user role in TOMCAT_HOME/conf/tomcat-users.xml file (Under <tomcat-users > section) as below, otherwise there will throw an unauthorized error during the maven project deploy process. Then we should restart tomcat server. When deploy war to tomcat in maven plugin, the role should be manager-scrip.

<!-- tomcat role is used to deploy maven project to tomcat in eclipse scripts.-->
<user username="tomcat" password="tomcat" roles="manager-script"/>
<!-- admin role is used to login tomcat manager GUI. -->
<user username="admin" password="admin" roles="manager-gui"/>

2-Then add below xml in the pom.xml plugins section.

<plugin>
   <groupId>org.apache.tomcat.maven</groupId>
   <artifactId>tomcat7-maven-plugin</artifactId>
   <version>2.2</version>
   <configuration>
      <url>http://localhost:8080/manager/text</url>
      <path>/DeployMavenToTomcat</path>
      <!-- Set update to true to avoid exist war package can not be override error -->
      <update>true</update>
      <!-- Because deploy this maven project using plugin in pom so use the manager-script role user. -->
      <username>tomcat</username>
      <password>tomcat</password>
   </configuration>
</plugin>

3-Right click the maven project, click Run As —> Run Configurations menu item.

4-Input clean install tomcat7:deploy in the Goals input text box.


5-Click Run button, when you see BUILD SUCCESS in the output console, that means the maven project has been deployed to tomcat server successfully.

6-Open a web browser, and input http://localhost:8080/manager/html, input admin / admin in the popup prompt. After you login, you can see DeployMavenToTomcat application in the application list


Saturday, April 25, 2020

Convert existing Java project to Maven


Convert existing Java or Spring project into Maven based Project-


Steps you need to follow-

1- Make sure your eclipse have installed maven plugin. if not then your need to install m2e-eclipse plugin in order to have this simple utility in Eclipse.

2- Now In your eclipse just right click on Java Project and click Configure and you should see “Convert to Maven Project” option


3- You will see dialogue like this below. Just enter“Name” and you should be all set.


4- Now you can see a new file pom.xml in your project- A Project Object Model or POM is the fundamental unit of work in Maven. It is an XML file that contains information about the project and configuration details used by Maven to build the project. It also manages all the jar dependency required by your project.


5- Next, make the list of all dependency jar which you have configured in Java Build Path and add  all jar dependency into pom.xml file.

6-To get maven jar dependency, go to https://mvnrepository.com/  (Maven website). Here search all jar one by one and select version.

7- Now copy the code mentioned in Maven tab (maven dependency code) and paste it into pom.xml under dependencies section as shown below.

8- One by one paste all the jar dependency in pom.xml.

9- All done, project has been converted into maven based project.

note : if you are getting any error in pom.xml then you need to update your maven. (Right click on project=> click on Maven=> Update Project; Make sure "Force Updateof Snapshots/Releases" is checked.)
--------------------------------------------------------------------------------------

Now How to compile and run the maven based project?

Step-1. Right click on project=> click on Maven=> Update Maven. Make sure "Force Update of Snapshots/Releases" is checked during project Update. (if done then skip it.)
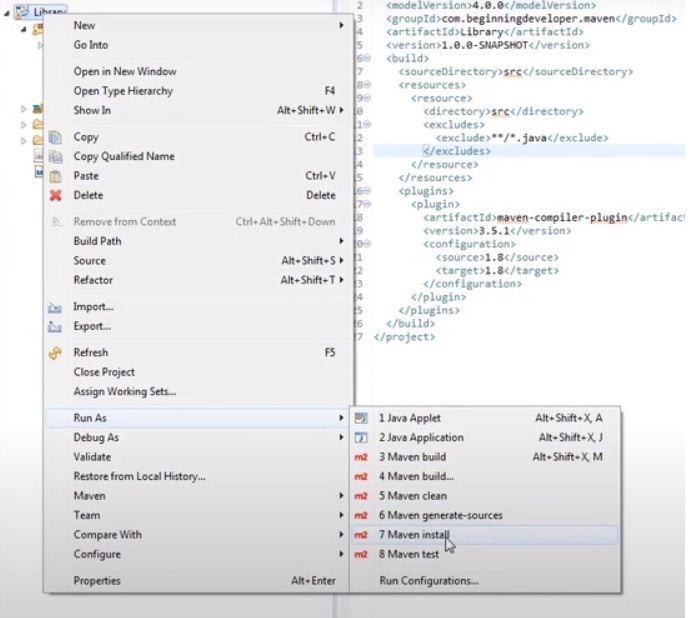
Step-2 After updating Right click on project=> click on Run As=> Maven Install (Shown Below)


and done :)
Check on the console. if you get any compilation error like Build Failer ("no compiler is provided in this environment perhaps you are running on a jre"). then=> 
Right Click on project=> Build Patah => Configure Build Path=>Select Library Tab=> Double Click on JRE System Library=>Now select Workspace default JRE option =>Finish & Apply.

Step-3 If you have faced any error in step-2 then again try to build by Right click on project=>Click on Run As=> Maven Clean and check console for a successful build.

Note:- During above steps if you still getting error or any issue or want to try all step again then first you need to delete .m2/repository from your eclipse working directory. (c:/user/username/.m2). Just close eclipse and delete .m2 folder and try again.


In case of any issue, you can watch below video-


Thursday, December 7, 2017

Excel split data into multiple worksheets based on column

 Here VBA Code to split data into multiple worksheets based on selected column

If you have an excel sheet and want to split the data into individual multiple sheet based on column valued then the below code is best for you.


Open Visual basic editor by pressing Alt+F11
On project window at left side => right click on project => insert=>Module.
now paste below code. read comments and set your parameter.

Sub parse_data()
Dim lr As Long
Dim ws As Worksheet
Dim vcol, i As Integer
Dim icol As Long
Dim myarr As Variant
Dim title As String
Dim titlerow As Integer
vcol = 7  ''name of column on which basis you want to create saprate sheet
Set ws = Sheets("finalsheet")  ''name of your master sheet which need to compile
lr = ws.Cells(ws.Rows.Count, vcol).End(xlUp).Row
title = "A1:V1"  ''range of column which need to transfer into each individual sheet
titlerow = ws.Range(title).Cells(1).Row
icol = ws.Columns.Count
ws.Cells(1, icol) = "Unique"
For i = 2 To lr
On Error Resume Next
If ws.Cells(i, vcol) <> "" And Application.WorksheetFunction.Match(ws.Cells(i, vcol), ws.Columns(icol), 0) = 0 Then
ws.Cells(ws.Rows.Count, icol).End(xlUp).Offset(1) = ws.Cells(i, vcol)
End If
Next
myarr = Application.WorksheetFunction.Transpose(ws.Columns(icol).SpecialCells(xlCellTypeConstants))
ws.Columns(icol).Clear
For i = 2 To UBound(myarr)
ws.Range(title).AutoFilter field:=vcol, Criteria1:=myarr(i) & ""
If Not Evaluate("=ISREF('" & myarr(i) & "'!A1)") Then
Sheets.Add(after:=Worksheets(Worksheets.Count)).Name = myarr(i) & ""
Else
Sheets(myarr(i) & "").Move after:=Worksheets(Worksheets.Count)
End If
ws.Range("A" & titlerow & ":A" & lr).EntireRow.Copy Sheets(myarr(i) & "").Range("A1")
Sheets(myarr(i) & "").Columns.AutoFit
Next
ws.AutoFilterMode = False
ws.Activate
End Sub


=========================
now its time to run your code by pressing F5.
Done!


Wednesday, July 26, 2017

X-Frame-Options Header Not Set 'ClickJacking' attacks

X-Frame-Options header is included in the HTTP response to protect against 'ClickJacking' attacks.

The X-Frame-Options header is used to indicate whether or not a website/browser should be allowed to open a page in frame or iframe.This will prevent website content embedded into other websites.
It protect against 'ClickJacking' attacks.
 
There are three options for X-Frame-Options: 

  • SAMEORIGIN: This option will allow page to be displayed in frame on the same origin, means you can render the same website page into iframe/frame. 
  •  DENY: This option will prevent a page displaying in a frame or iframe, means no one website can render website page in frame/iframe.  
  • ALLOW-FROM uri: This Option will allow page to be displayed only on the specified origin.if you want to allow render the page of website for a particular website then you can use this option.

Syntax: 

IN HTML Page:- Type below code in head section:


       http-equiv="X-FRAME-OPTIONS" content="DENY">
 
IN PHP Page:- 


 ========================================================
You can use any web developer tool to view Response headers and ensure you see


======================================================

Configuring Apache HOw to Check X-Frame-Option of a web page:
To configure Apache to send the X-Frame-Options for all pages, add below setting to your site as required:

  • Header always append X-Frame-Options SAMEORIGIN 
  • Header set X-Frame-Options DENY 
  • Header set X-Frame-Options "ALLOW-FROM https://example.com/"  
======================================================