About Me

My photo
India
Hey there, lovely people! I'm Hemant Menaria, and I'm passionate about programming. Having completed my MCA in 2011, I've delved into the world of coding with fervor. I believe in sharing knowledge, making complex concepts easy to grasp for everyone. JAVA, PHP, and ANDROID hold a special place in my heart, and I spend most of my time immersed in them. Currently, I'm deeply engaged in API/Webservice frameworks and crafting Hybrid mobile applications to enhance flexibility in the digital realm. If you ever find yourself stuck with a programming challenge, feel free to reach out to me at +91-8955499900 or drop me a line at hemantmenaria008@gmail.com. I'm always eager to help fellow enthusiasts navigate the intricacies of coding!

Wednesday, July 22, 2020

Export And Save Each Worksheet As Separate


Export And Save Each Worksheet As Separate New Workbook In Excel


Open Visual basic editor by pressing Alt+F11
On project window at left side => right click on project => insert=>Module.
now paste below code. 

Option Explicit

Sub SaveShtsAsBook()
    Dim Sheet As Worksheet, SheetName$, MyFilePath$, N&
    MyFilePath$ = ActiveWorkbook.Path & "\" & _
    Left(ThisWorkbook.Name, Len(ThisWorkbook.Name) - 4)
    With Application
        .ScreenUpdating = False
        .DisplayAlerts = False
         '      End With
        On Error Resume Next '<< a folder exists
        MkDir MyFilePath '<< create a folder
        For N = 1 To Sheets.Count
            Sheets(N).Activate
            SheetName = ActiveSheet.Name
            Cells.Copy
            Workbooks.Add (xlWBATWorksheet)
            With ActiveWorkbook
                With .ActiveSheet
                    .Paste
                    .Name = SheetName
                    [A1].Select
                End With
                 'save book in this folder
                .SaveAs Filename:=MyFilePath _
                & "\" & SheetName & ".xls"
                .Close SaveChanges:=True
            End With
            .CutCopyMode = False
        Next
    End With
    Sheet1.Activate
End Sub


Sunday, April 26, 2020

Set CATALINA_HOME, JRE_HOME, JAVA_HOME in environment variable using command line


To set CATALINA_HOME, JRE_HOME, JAVA_HOME in environment variable 

To run apache tomcat server this is a basic requirement-

1- Open command Prompt=> Run as administrator

2- Now type below command one by one.
setx JAVA_HOME -m "Java/JDK_Installation_Directory_Path";
setx JRE_HOME -m "Java/JRE_Installation_Directory_Path";
setx CATALINA_HOME -m "Tomcat_Directory_Path/bin";

3-Now restart system.

4- To verify environment variable run following command one by one-
echo %JAVA_HOME%
echo %JRE_HOME%
echo %CATALINA_HOME%

Now run tomcat.(in case of installer)
or
In case of tomcat downloaded folder-
1- Open command Prompt=> Run as administrator
2- Go to tomcat directory/bin folder.
3- execute/run startup.bat
4- you will get a separate window which shows tomcat status.

Its ready to play.

Various error during maven configuration with java spring


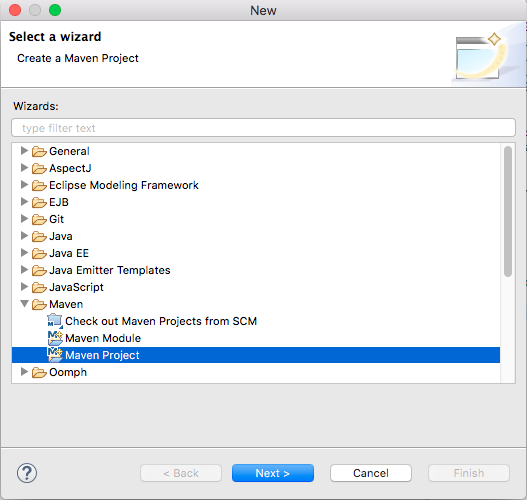
Q1- During project Creation or Maven Update or if Pom.xml showing any error or dependecy jar not loading then-
Solution:  Go to User Profile Foler =>.m2=>delete .lastupate.

if you unable to find User Profile folder then follow below steps-
1-Open folder by running this text (without Quotes) in Search Explorer of Window “%USERPROFILE%.m2”.
2-After running above command, “m2” folder of maven will open. Now search for file (without Quotes) “*.lastUpdated”.
3-In this step, delete all the files found by running Step 2.
4-Now go to Eclipse project and select “Maven | Update Dependency” or “Maven | Update Project”
5-If you still facing error then close eclipse and delete .m2 folder and try again.

-----------------------------------------------------------------------------------------
Q2- Could not transfer artifact org.apache.maven.plugins:maven-surefire-plugin:pom:2.7.1 from/to central
or
ArtifactTransferException: Could not transfer artifact
or
How to create settings.xml
Solution: Create settings.xml file in User Profile Foler =>.m2 folder.  ( if you are unable to fine user profile folder then see Q1 (above).
To create settings.xml file-> open notepad-> paste below code-> save as-> File Name- settings.xml. Save As Type- All and Save.

<settings xmlns="http://maven.apache.org/SETTINGS/1.0.0"
xmlns:xsi="http://www.w3.org/2001/XMLSchema-instance"
xsi:schemaLocation="http://maven.apache.org/SETTINGS/1.0.0
https://maven.apache.org/xsd/settings-1.0.0.xsd">
<localRepository>${user.home}/.m2/repository</localRepository>
<interactiveMode>true</interactiveMode>
<offline>false</offline>
</settings>
---------------------------------------------------------------------------------

Q3- tomcat:deploy: “Cannot invoke Tomcat manager: Connection refused”
Solution: Before deploying of project make sure following-
For tomcat7 or tomcat 8 do the following-

1- Project- pom.xml

<plugin>
    <groupId>org.apache.tomcat.maven</groupId>
    <artifactId>tomcat7-maven-plugin</artifactId>
    <version>2.2</version>
    <configuration>
        <url>http://localhost:8080/manager/text</url>       
        <path>/projectName</path>
        <username>tomcat</username>
        <password>tomcat</password>
    </configuration>
</plugin>

2- TomcatDirectory\conf\ tomcat-users.xml: Add below line in  section
<role rolename="manager-gui"/>
  <role rolename="manager-status"/>
  <role rolename="manager-script"/>
  <role rolename="manager-jmx"/>
  <user username="tomcat" password="tomcat" roles="manger-gui,manager-status,manager-script,manager-jmx"/>
it will show like this-
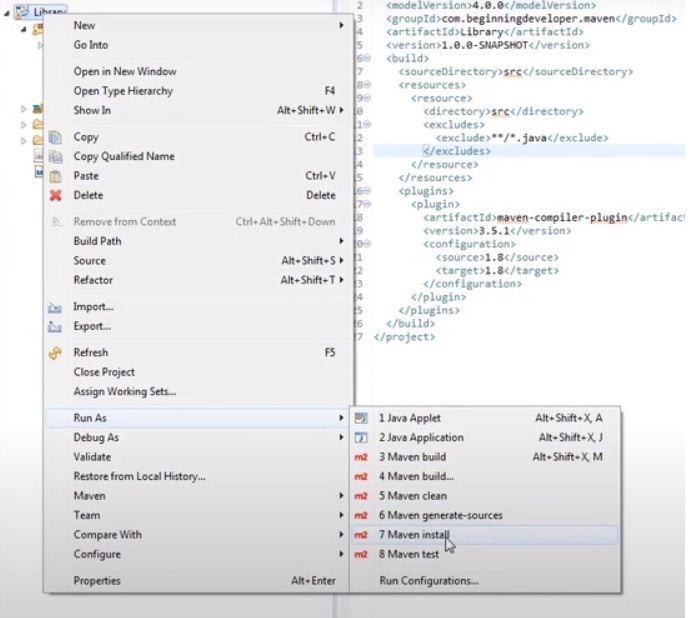
Now run project and deploy it (Right Click on project=>Run as=>Run Configuration)
Gole:- clean install tomcat7:deploy   (For first time deployment) and for next time use clean install tomcat7:redeploy
Profile:-Leave Blank
Gole:-Default or path (if you have created settings.xml)


Create a maven project and Deloy maven project with tomcat


In this tutorial we learn-
1- How to create Maven based Java web project.
2- How to deploy/run project with tomcat server.


First make sure your eclipse have installed maven plugin. if not then your need to install m2e-eclipse plugin in order to have this simple utility in Eclipse.


1  Create Maven Project in STS ( Spring Tool Suite ).


1-Click File —> New —> Others menu, select Maven Project in the popup wizard dialog.
eclipse file new others maven project wizard dialog

2-Click Next button, check Create a simple project checkbox in the next dialog.


3-Input the spring project group id, artifact id and select packaging type with war in the next dialog.


4-Click Finish button to complete the wizard. In the left package explorer panel, you can see the project just created, the project name is just the artifact id.


5-There is an error in the pom.xml, the error message is “web.xml is missing and is set to true“, so copy below xml code into pom.xml between project xml tag.
<build>
    <finalName>Deploy maven project to tomcat example</finalName>
       <plugins>
          <plugin>
             <artifactId>maven-war-plugin</artifactId>
             <version>2.3</version>
             <configuration>
               <failOnMissingWebXml>false</failOnMissingWebXml>
             </configuration>
          </plugin>
       </plugins>
</build>


6-Now right click the project name in left package explorer panel, click Maven —> Update Project menu item, then all the project error will disappear.


2. Deploy Maven Project To Tomcat.

First make sure following-
1- Tomcat is installed or have downloadd Tomcat Folder.
2-CATALINA_HOME (tomcat), JRE_HOME (jre) or JAVA_HOME (java) set in system environment veriable. (how to set environment veriable- http://hemantmenaria.blogspot.com/search/label/set%20catalina_home)
3- Need to start tomcat.

1-Before we can deploy eclipse maven project to tomcat, we need to add below user role in TOMCAT_HOME/conf/tomcat-users.xml file (Under <tomcat-users > section) as below, otherwise there will throw an unauthorized error during the maven project deploy process. Then we should restart tomcat server. When deploy war to tomcat in maven plugin, the role should be manager-scrip.

<!-- tomcat role is used to deploy maven project to tomcat in eclipse scripts.-->
<user username="tomcat" password="tomcat" roles="manager-script"/>
<!-- admin role is used to login tomcat manager GUI. -->
<user username="admin" password="admin" roles="manager-gui"/>

2-Then add below xml in the pom.xml plugins section.

<plugin>
   <groupId>org.apache.tomcat.maven</groupId>
   <artifactId>tomcat7-maven-plugin</artifactId>
   <version>2.2</version>
   <configuration>
      <url>http://localhost:8080/manager/text</url>
      <path>/DeployMavenToTomcat</path>
      <!-- Set update to true to avoid exist war package can not be override error -->
      <update>true</update>
      <!-- Because deploy this maven project using plugin in pom so use the manager-script role user. -->
      <username>tomcat</username>
      <password>tomcat</password>
   </configuration>
</plugin>

3-Right click the maven project, click Run As —> Run Configurations menu item.

4-Input clean install tomcat7:deploy in the Goals input text box.


5-Click Run button, when you see BUILD SUCCESS in the output console, that means the maven project has been deployed to tomcat server successfully.

6-Open a web browser, and input http://localhost:8080/manager/html, input admin / admin in the popup prompt. After you login, you can see DeployMavenToTomcat application in the application list


Saturday, April 25, 2020

Convert existing Java project to Maven


Convert existing Java or Spring project into Maven based Project-


Steps you need to follow-

1- Make sure your eclipse have installed maven plugin. if not then your need to install m2e-eclipse plugin in order to have this simple utility in Eclipse.

2- Now In your eclipse just right click on Java Project and click Configure and you should see “Convert to Maven Project” option


3- You will see dialogue like this below. Just enter“Name” and you should be all set.


4- Now you can see a new file pom.xml in your project- A Project Object Model or POM is the fundamental unit of work in Maven. It is an XML file that contains information about the project and configuration details used by Maven to build the project. It also manages all the jar dependency required by your project.


5- Next, make the list of all dependency jar which you have configured in Java Build Path and add  all jar dependency into pom.xml file.

6-To get maven jar dependency, go to https://mvnrepository.com/  (Maven website). Here search all jar one by one and select version.

7- Now copy the code mentioned in Maven tab (maven dependency code) and paste it into pom.xml under dependencies section as shown below.

8- One by one paste all the jar dependency in pom.xml.

9- All done, project has been converted into maven based project.

note : if you are getting any error in pom.xml then you need to update your maven. (Right click on project=> click on Maven=> Update Project; Make sure "Force Updateof Snapshots/Releases" is checked.)
--------------------------------------------------------------------------------------

Now How to compile and run the maven based project?

Step-1. Right click on project=> click on Maven=> Update Maven. Make sure "Force Update of Snapshots/Releases" is checked during project Update. (if done then skip it.)
Step-2 After updating Right click on project=> click on Run As=> Maven Install (Shown Below)


and done :)
Check on the console. if you get any compilation error like Build Failer ("no compiler is provided in this environment perhaps you are running on a jre"). then=> 
Right Click on project=> Build Patah => Configure Build Path=>Select Library Tab=> Double Click on JRE System Library=>Now select Workspace default JRE option =>Finish & Apply.

Step-3 If you have faced any error in step-2 then again try to build by Right click on project=>Click on Run As=> Maven Clean and check console for a successful build.

Note:- During above steps if you still getting error or any issue or want to try all step again then first you need to delete .m2/repository from your eclipse working directory. (c:/user/username/.m2). Just close eclipse and delete .m2 folder and try again.


In case of any issue, you can watch below video-