

Convert existing Java or Spring project into Maven based Project-
Steps you need to follow-
1- Make sure your eclipse have installed maven plugin. if not then your need to install m2e-eclipse plugin in order to have this simple utility in Eclipse.- You can follow below link to install Maven plugin in eclipse-https://stackoverflow.com/questions/8620127/maven-in-eclipse-step-by-step-installation
2- Now In your eclipse just
right click on Java Project and click Configure and you should see “Convert to Maven Project” option
3- You will see dialogue like this below. Just enter“
Name” and you should be all set.
4- Now you can see a new file pom.xml in your project- A Project Object Model or POM is the fundamental unit of work in Maven. It is an XML file that contains information about the project and configuration details used by Maven to build the project. It also manages all the jar dependency required by your project.

5- Next, make the list of all dependency jar which you have configured in Java Build Path and add all jar dependency into pom.xml file.
6-To get maven jar dependency, go to https://mvnrepository.com/ (Maven website). Here search all jar one by one and select version.
7- Now copy the code mentioned in Maven tab (maven dependency code) and paste it into pom.xml under dependencies section as shown below.
 8- One by one paste all the jar dependency in pom.xml.
9- All done, project has been converted into maven based project.
note : if you are getting any error in pom.xml then you need to update your maven. (Right click on project=> click on Maven=> Update Project; Make sure "Force Updateof Snapshots/Releases" is checked.)
--------------------------------------------------------------------------------------
Check on the console. if you get any compilation error like Build Failer ("no compiler is provided in this environment perhaps you are running on a jre"). then=>
Right Click on project=> Build Patah => Configure Build Path=>Select Library Tab=> Double Click on JRE System Library=>Now select Workspace default JRE option =>Finish & Apply.
Step-3 If you have faced any error in step-2 then again try to build by Right click on project=>Click on Run As=> Maven Clean and check console for a successful build.
Note:- During above steps if you still getting error or any issue or want to try all step again then first you need to delete .m2/repository from your eclipse working directory. (c:/user/username/.m2). Just close eclipse and delete .m2 folder and try again.
In case of any issue, you can watch below video-
note : if you are getting any error in pom.xml then you need to update your maven. (Right click on project=> click on Maven=> Update Project; Make sure "Force Updateof Snapshots/Releases" is checked.)
--------------------------------------------------------------------------------------
Now How to compile and run the maven based project?
Step-1. Right click on project=> click on Maven=> Update Maven. Make sure "Force Update of Snapshots/Releases" is checked during project Update. (if done then skip it.)
Step-2 After updating Right click on project=> click on Run As=> Maven Install (Shown Below)

and done :)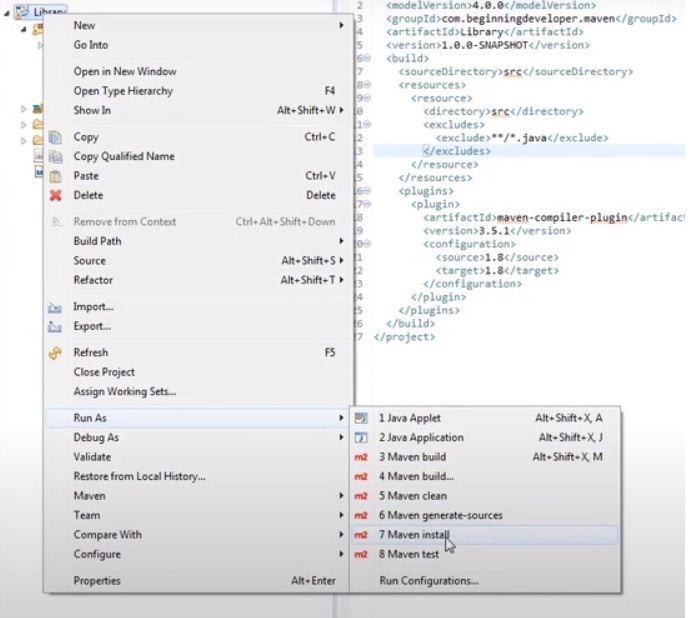
Check on the console. if you get any compilation error like Build Failer ("no compiler is provided in this environment perhaps you are running on a jre"). then=>
Right Click on project=> Build Patah => Configure Build Path=>Select Library Tab=> Double Click on JRE System Library=>Now select Workspace default JRE option =>Finish & Apply.
Step-3 If you have faced any error in step-2 then again try to build by Right click on project=>Click on Run As=> Maven Clean and check console for a successful build.
Note:- During above steps if you still getting error or any issue or want to try all step again then first you need to delete .m2/repository from your eclipse working directory. (c:/user/username/.m2). Just close eclipse and delete .m2 folder and try again.
In case of any issue, you can watch below video-
No comments:
Post a Comment