

In this tutorial we learn-
1- How to create Maven based Java web project.
2- How to deploy/run project with tomcat server.
First make sure your eclipse have installed maven plugin. if not then your need to install m2e-eclipse plugin in order to have this simple utility in Eclipse.
- You can follow below link to install Maven plugin in eclipse-https://stackoverflow.com/questions/8620127/maven-in-eclipse-step-by-step-installation
1 Create Maven Project in STS ( Spring Tool Suite ).
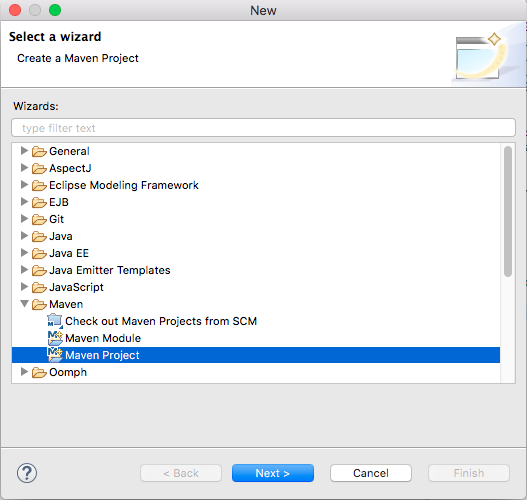
1-Click File —> New —> Others menu, select Maven Project in the popup wizard dialog.
eclipse file new others maven project wizard dialog
2-Click Next button, check Create a simple project checkbox in the next dialog.


4-Click Finish button to complete the wizard. In the left package explorer panel, you can see the project just created, the project name is just the artifact id.

5-There is an error in the pom.xml, the error message is “web.xml is missing and
<build>
<finalName>Deploy maven project to tomcat example</finalName>
       <plugins>
          <plugin>
             <artifactId>maven-war-plugin</artifactId>
             <version>2.3</version>
             <configuration>
               <failOnMissingWebXml>false</failOnMissingWebXml>
             </configuration>
          </plugin>
       </plugins>
</build>

2. Deploy Maven Project To Tomcat.
First make sure following-1- Tomcat is installed or have downloadd Tomcat Folder.
2-CATALINA_HOME (tomcat), JRE_HOME (jre) or JAVA_HOME (java) set in system environment veriable. (how to set environment veriable- http://hemantmenaria.blogspot.com/search/label/set%20catalina_home)
3- Need to start tomcat.
1-Before we can deploy eclipse maven project to tomcat, we need to add below user role in TOMCAT_HOME/conf/tomcat-users.xml file (Under <tomcat-users > section) as below, otherwise there will throw an unauthorized error during the maven project deploy process. Then we should restart tomcat server. When deploy war to tomcat in maven plugin, the role should be manager-scrip.
<!-- tomcat role is used to deploy maven project to tomcat in eclipse scripts.--><!-- admin role is used to login tomcat manager GUI. -->
2-Then add below xml in the pom.xml plugins section.
<plugin>
<groupId>org.apache.tomcat.maven</groupId>
<artifactId>tomcat7-maven-plugin</artifactId>
<version>2.2</version>
<configuration>
<url>http://localhost:8080/manager/text</url>
<path>/DeployMavenToTomcat</path>
<!-- Set update to true to avoid exist war package can not be override error -->
<update>true</update>
<!-- Because deploy this maven project using plugin in pom so use the manager-script role user. -->
<username>tomcat</username>
<password>tomcat</password>
</configuration>
</plugin>
3-Right click the maven project, click Run As —> Run Configurations menu item.

4-Input clean install tomcat7:deploy in the Goals input text box.

5-Click Run button, when you see BUILD SUCCESS in the output console, that means the maven project has been deployed to tomcat server successfully.
6-Open a web browser, and input http://localhost:8080/manager/html, input admin / admin in the popup prompt. After you login, you can see DeployMavenToTomcat application in the application list

No comments:
Post a Comment